How to Sand Floorboards
So you’ve taken up your carpet and underlay and realised you’ve got some lovely pine floorboards.
Although the floorboards were designed to be the sub floor and supposed to have another type of flooring over the top such as carpet, wood floor or tiles for instance, it’s still possible and very popular to sand back and re finish the floorboard, and they can look great if done correctly.
Firstly we would recommend you hire a professional to complete the work. We invest many thousands into state of the art equipment and have regular training, as well as extensive product knowledge.
However if you enjoy getting your hands dirty and want to give it a go yourself here’s one of the ways we tackle sanding pine floorboards.
Our methods and processes do change from job to job slightly but here’s a view from a recent job we completed.
What to look for before you start sanding:
- Check that the floorboard are fixed well, if loose then nail them to secure them. Be aware that under the boards could be electrical wires and water pipes so take care!
- Any nails, staples of screw that are raised either need removing or punching deeper into the boards, if left these will damage your belt sanding machine which can be very costly.
- How are the gaps in between the boards? Has the tongue on the floorboards been damaged? If so you might want to think about using pine slithers in the joints or replacing boards.
Time to get sanding!
Here’s the list of the equipment what we typically use on a job:
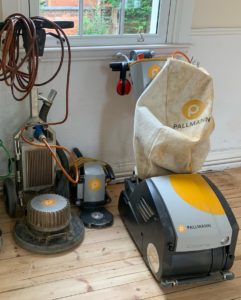
- Pallmann Cobra 09 Belt Sander
- Pallmann Star Edge sander
- Pallmann Gecko edge sander
- Pallmann Spider (triple disc machine to achieve a fine smooth finish)
- Festool Rotex 150
- Vacuum system H class with separator to collect the dust.
- Abrasives for the belt sander and the edgers. 24-40-60-80-100grit. The amount used varies with every job but you will want a few of each.
- Floor scrapers for the corners
- 120 multi hole used as final sanding stage and to de nib between coats of lacquer
How to Sand Pine Floorboards
Starting with the belt sander ideally using 40 grit sand along the length of the board with the grain of the wood, removing the old dirty wood and any old finishes or paint. If the boards are cupped it might be necessary to sand across the boards at a 15 degree angle to sand the boards flat. You will then need to sand along the grain of the wood to remove the deep scratch patterns.
If the 40 grit doesn’t work you might have to drop down to 24grit with the same process, then complete the 40 grit after.
Try to remove all the damage, dirt and old finishes at this 1st stage as they will be harder to resolve with the finer grit paper.
At this point we like to sand the edges using 1 of our edgers, depending on the finish on the floor start with the 40grit to match the main floor.
Now is also a good time to fit any pine slithers, cutting them to size, gluing and using a soft mallet to hammer them firmly into the gaps. Once the glue has dried you can sand these flat matching the rest of the floor.
Next you will be completing the same processes as before using the 60 grit on the belt and edger then again with the 80 grit and again with 100 grit.
Sanding the floor in this process will mean as the grit get higher it’s reducing the deep scratches in the floor creating finer and finer scratches until you have a smooth finish.
Following this we would use a 100 grit on the Pallmann spider the triple disc machine over all of the floor.
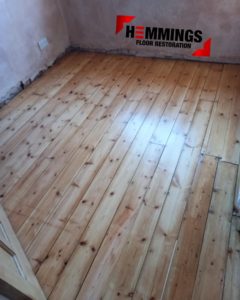
Next we use a 17inch 120grit multihole or mesh screen on the Pallmann spider over the full floor giving us a lovely smooth finish.
That’s it sanding done!
Next it’s time to apply a finish to your floor.
Mostly we use either and stain and lacquer or a standard primer and lacquer – ensuring the correct cure times between each product
We will follow up this blog with staining and finishing pine floorboards.
If you would like more information on wood floor sanding then please contact us